The driver side window has been stuck down for about a week now (in addition to our tailgate window being stuck down).
But since there's no rusty power motor to worry about, it should be a simple fix right? Fortunately, it was.
Symptom: the crank still turned but the window was stuck down.
Problem: A broken regulator roller. The regulator arm connects to a plastic roller that sits in a channel. The roller is held on with a metal clip. If the plastic breaks around the clip, the roller won't be held on and can come off the regulator arm.
Solution: replace the window regulator roller.
Getting the door cover off took a little work. It's held down at each side with two metal clips that push into a hole. You can see two of the clips below. The whole piece is a little messed up. It's worn, torn, and warped. But it works for now.
Under the cover there was plastic sheeting covering most of the metal. Under the plastic sheeting was some grey, putty-like substance. Not sure what that is yet, but I didn't appreciate being there and scraped most of it off. It started raining though so I decided to just put the thing back together.
Another thing I did was clean out the bottom of the door. A lot of black crud had collected and was covering the holes where water is supposed to drain. That's not good for rust prevention, so I'm glad I got to it.
Thursday, May 20, 2010
Saturday, May 15, 2010
Tailgate: exposing the rusty motor
I removed the power window motor in the tailgate to see if it might need cleaned inside.
I used penetrating oil and a wire wheel to remove the exterior rust.
At first the inside didn't look too terrible, but then I looked inside the motor casing and saw that on one side a lot of the lacquer had come off. This was probably causing multiple short circuits. Additionally, I noticed one spot where the was a definite break in one of the windings. I would try to get the windings off for inspection (possibly repair) but they're held on with a rivet.
I cleaned up the shaft that was a little rusty. It turned much easier after this.
I put the thing back together and turned it on. It worked at first, but then it slowed down and finally started smoking (aah!).
So much for fixing the motor.
Monday, May 3, 2010
The dreaded rear window
Our rear power window has been stuck down for a couple of weeks now, so I finally opened up the tailgate to have a look inside.
It was quite a chore to get the rusty screws off, but in the end my channel locks prevailed. Inside I found a lot of crud that I guess has been accumulating since 1962. After removing that I was able to get a good look at what makes the window go up and down.
Each arms attaches at the bottom of the window with a roller inside a channel. By removing the keeper pin, the arm can be detached from the roller and the window can be pulled out.
I was able to remove the roller on one side without too much trouble. Unfortunately, the other roller was stuck to the pin and broke off.
Once the window was removed I checked the voltage going to the motor, and it was fine. And sure enough, with the window off, the arms moved up when the motor was switched on.
Because the arms moved I figured the motor must be working and put everything back together. Unfortunately, it still wouldn't roll up. I guess the motor works, just not very well. Not too surprising when you look at it.
So I ordered a new roller to replace the one I broke (6 on eBay for $5), and now I need to look into getting a new motor.
Oh, and I was able to get the window up by putting a nylon strap under the window and lifting up to help the motor out.
Saturday, May 1, 2010
The wiper gets a new spring
The first time we drove the Falcon in the rain we noticed that one of the wipers was lame. Unfortunately it was on the driver's side.
But when I replaced the wiper blade it still performed poorly. A coworker suggested replacing the spring inside the wiper arm. $1.43 and a new spring later and it's working like new!
Friday, April 23, 2010
200 CID 6 Cyl Engine Specs
Here are the specifications for a 200 CID 6 Cyl engine:
I'm not sure if the timing number is right. I've seen a couple people use 8 or 12 degrees, so I think I need to get a manual to find out for sure...
Spark plugs | BF-82 |
Gap | 0.034 |
Point Dwell | 38 degs. |
Point Gap | 0.027 in |
6 degs. BTDC | |
Idle speed | |
Oil pressure | 35-60 psi |
1 barrel | Autolite 1100 |
Cam type | HYD |
Bore and stroke | 3.68 x 3.13 |
Compression Ratio | 8.8 to 1 |
I'm not sure if the timing number is right. I've seen a couple people use 8 or 12 degrees, so I think I need to get a manual to find out for sure...
Dwell meter redeemed
So the dwell meter does work! It turns out the red lead on the dwell meter goes to the negative terminal on the ignition coil, despite the instructions on the dwell meter that say to do the opposite...
With the points set to .025", I measured around 38 degrees dwell. Exactly right!
Now I need to adjust the idle using the tachometer function provided by the dwell meter.
With the points set to .025", I measured around 38 degrees dwell. Exactly right!
Now I need to adjust the idle using the tachometer function provided by the dwell meter.
Thursday, April 22, 2010
(Old) New Toys
A coworker graciously gave me his dad's old timing light, dwell meter, and torque wrench. They're vintage and awesome.
The timing light seems to be working just fine. Here it is hooked up to the #1 spark plug:
I think the dwell meter is broken, because it doesn't seem to respond when I change the points.
The timing light seems to be working just fine. Here it is hooked up to the #1 spark plug:
I think the dwell meter is broken, because it doesn't seem to respond when I change the points.
Saturday, April 17, 2010
The Tune-Up
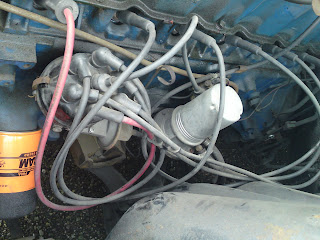
At last I've given the Falcon a tune-up. New spark plugs, wires, distributor cap, rotor, and contact breakers (points). Everything except the condenser, which neither NAPA nor O'Reilley's had in stock.
First I replaced the plugs, wires and distributor cap. I found out that the spark plugs needed to be gapped to 0.035", which they already were. And happily, the distributor had numbers on top that corresponded to each cylinder so I wasn't worried about mixing up the wires.
Here's before/after:
Here are the old spark plugs (Autolite).
These are the new ones:
Then I replaced the rotor and the points (inside the distributor).
These are the points (old ones the left).
Unfortunately I didn't know what to set the gap to. The manager at O'Reilley's suggested we start with 0.016". So we did. I think that's way off, though. The 1966 Mustang had a 200 cid 6cyl as well and (according to this link) the points need to be set at 0.025", with a dwell of around 39 deg. Next week I'm supposed to be getting a dwell meter from someone at work, so I'll be able to check it.
I also adjusted the ignition timing, using Albie's timing light. I adjusted it to 12 degrees Before Top Dead Center (BTDC). That number came from another 1966 Mustang forum post.
After all that, it doesn't seem to be running any better. Probably because the points aren't set right. I'll have to try adjusting them later.
Tuesday, April 13, 2010
Idle
I took the Falcon to work today. Steve, a coworker, adjusted the idle. He lowered the idle speed and richened the idle mix (about 0.75 turns in). It's now running much smoother.
Tuesday, April 6, 2010
The Carburetor
Today I took off the air filter to check out the carburetor. It's pretty small, but I'm told it's somewhat important. Here's what it looks like:
Monday, March 22, 2010
Under the hood
We took the Falcon to Albie's house to change the oil (I need to get some ramps and an oil catch) and replace the air filter. I used a FRAM CA184 air filter and PH8A oil filter. Albie's brother James was also there and helped us examine inside the hood.
While we were looking under the hood we noticed a few things:
- It has a DC generator and external voltage regulator, rather than an alternator with a built-in regulator.
- The fuel filter is inline with the fuel pump (not under the carburetor).
- The valve cover gasket was leaking slightly, probably from over or under tightening.
- The transmission fluid was is very good condition (bright red).
- The engine timing was pretty bad. Most of the cylinders weren't firing correctly.
- The spark plugs are worn.
- The terminals inside the distributor are blackened.
- The contact breaker points inside the distributor are worn.
- There is a valve along the hose that runs to the heater core; the valve was closed.
- The radiator and water pump look newly replaced.
Saturday, March 20, 2010
Buying the car
We went to Seattle this morning to buy the wagon. We decided it might be good to have someone with more expertise check it out, so we asked Beth's dad to come with us.
After some examination we were still satisfied that it was in good shape and there wouldn't be any problems.
Here's the owner, Cathy, standing in front of her cool house.
And here's the key to our new family wagon. Off we go!
After some examination we were still satisfied that it was in good shape and there wouldn't be any problems.
Here's the owner, Cathy, standing in front of her cool house.
And here's the key to our new family wagon. Off we go!
Friday, March 19, 2010
We're buying the wagon!
We decided to buy a 1962 Ford Falcon Wagon. Even though it's going to need some work, it's very appealing (especially the price) and it's going to be my opportunity to learn about cars. We're picking up the wagon tomorrow morning, so until then here's the pictures we took when we went to see it yesterday.
Subscribe to:
Posts (Atom)